Friday, January 14, 2022

January Krafty Peeks... Day TWO! My Type!


 Welcome back to Day TWO of our January Krafty Peeks!

Are you excited about what you've seen so far!?  Are you ready for more?

I hope your answer was yes because we've got more fabulous fun for you today!


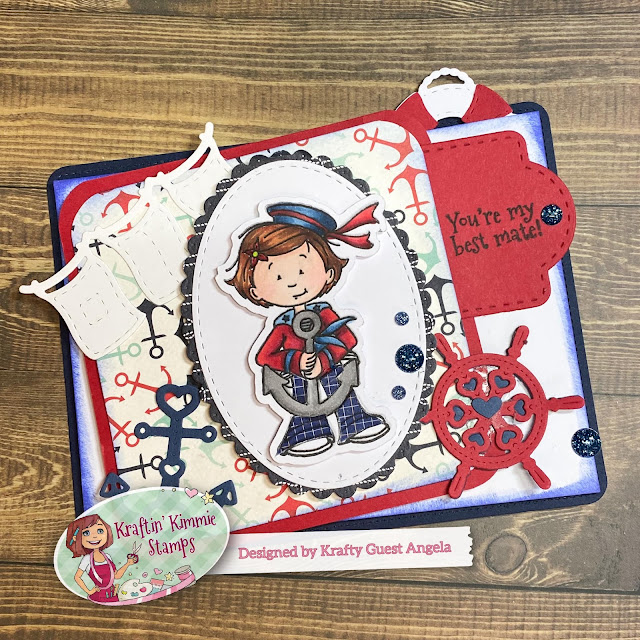
The stamp set we are 'peeking' for you today is from 

artist Melissa Baker-Nguyen
 and it's called.....

MY TYPE!


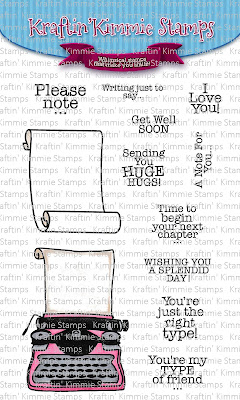
This clever set is so perfect for sending a note for so many different occasions!


I stamped the images on Copic Xpress It cardstock and colored with Copics:

Typewriter:  N1, N3, N5,
Paper: CO Colorless Blender.


I paired with some pattern paper and embellishments from my stash and love how my card turned out!

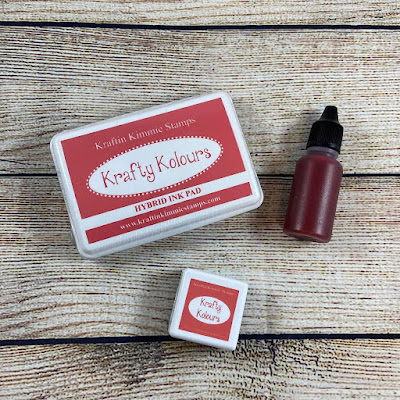
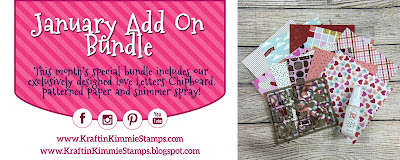
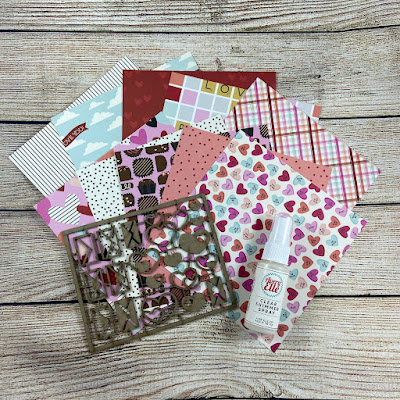
 Check out MY TYPE! in so many awesome creations today as you hop around the Krafty Team's blogs!  You'll also see the new stencils, Add-On bundle and hybrid ink along the way! 

 Be sure to leave some love at each stop on the hop because there will be a giveaway of some krafty $$ to the shop! 

You'll see more of our January goodies all week, and then everything will be released after our LIVE Online Release Party on Saturday afternoon at 2 pm ET in the Krafty Friends facebook group!  

Release party event: https://fb.me/e/2SllwA57P


For now, check out all the fantastic goodness in today's hop!
See you tomorrow!


You are invited to the Inlinkz link party!

Click here to enter

Thursday, January 13, 2022

January Krafty Peeks... Day ONE! Stinkin' Cute!


 Who's ready for lots of brand new Krafty goodies?!

It's time for our January Release Peeks to begin 


Our first peek features the adorable set of sweet skunks in love
designed by Neda Sadreddin
 called.....
STINKIN' CUTE!


This set is perfect of course for Valentines Day, but can be used all year long for Love, Birthday, Happy Mail and simply cute cards!!

As you hop around the design team's blogs today you'll be able to check out STINKIN' CUTE! in action 
in combination with a lot of our other new 
January Kraftin' Kimmie products!  

You will spot our newest addition to the Kraftin' Kimmie Hybrid Ink rainbow!  It's a gorgeous new colour.....called BASHFUL BLUSH! 


As always it will be available in full sized ink pads, ink cubes and ink refills!

We've got TWO new Krafty Stencils for this month's release to help add some funky fun to your creations!  

They are called....
MOUNTAINS OF MAIL!


and LOTS OF LOVE!


Both designs are perfect for all your cards, scrapbook pages, mixed media and more!


I used copics to color my skunk-

T1, T3, T5, T7 R20 White Gel Pen
Balloon R14, R22, R35

I inked my hearts and Lots of Love chipboard heart with Bashful Blush Ink. 

I layered all pieces with foam tape.


Plus we have our exclusive JANUARY ADD ON BUNDLE!


Our exciting Add-On bundle this month features several amazing products which will coordinate with our new goodies and will help you enhance your new creations!! 


This month's special curated Add On Bundle includes:

  • Avery Elle Clear Shimmer Spray
  • Simple Stories Sweet Talk Paper
  • Exclusive Lots of Love Chipboard

  A limited number will be available in the shop on Saturday afternoon after our Live Release Party! Get ready to get krafty!!

You'll get to see all of our brand new goodies in action over the next few days of the January Krafty Peeks and everything will be released at our LIVE Release Party 

on  Saturday, January 15th @ 2 pm ET in the Krafty Friends group!


Release party event: https://fb.me/e/2SllwA57P


For now, hop around and check out some amazing creations from the Krafty Team and be sure to leave some love at each stop on the hop!  Your comment could be a WINNER of some krafty $$ to use in the shop!  (Not to mention our designers are incredible and you should tell them so!  😉  )

Come on back tomorrow for some more krafty fun and goodness!

You are invited to the Inlinkz link party!

Click here to enter

Saturday, January 8, 2022

Paper Piecing Challenge at Kraftin Kimmie Stamps

Hey everyone!   Today I am back with this week's challenge over at Kraftin Kimmie Stamps- Paper Piecing.  


I used the Ahoy Sailor- Stamping the girl with  Kraftin KimmieWicked Black ink- which has to be my favorite ink to stamp and color with as it's safe for Alcohol markers.

I colored with Copics:

Skin: E00, 11, 21, R20
Hair: E13, E15, E18
Reds: R35, 37, 59
Blues: B93, B95, B97, B99
Anchor: N1, N2, N3, N5

I used pattern paper from my stash (I believe this was Catherine Pooler) and stamped my image and then fussy cut the pants to paper piece onto my image.


I used a Stitched Rounded Rectangles die from Elizabeth Craft Designs to create my base layer.  I inked my layers with Kraftin Kimmie Incredible Indigo ink.


Next I used a couple of Oval dies to mat my image on and then used foam tape to pop up both the ovals and the image.


I added some various nautical dies from my stash and a couple, and some enamel dots add the finishing touches.

I added the sentiment on to a tag tucked into the card- when I originally created I did not plan on using the tag, but found my card had a big open space that needed something added.


I hope you enjoyed my card.


See you soon!   


Saturday, January 1, 2022

More than one fold- with Kraftin Kimmie Stamps

 I am so honored to start the new year guest designing for Kraftin Kimmie Stamps.     This week's challenge theme is More than One fold.     


I used the Smarty Pants Stamp Set- Stamping the girl with  Kraftin KimmieWicked Black ink- which has to be my favorite ink to stamp and color with as it's safe for Alcohol markers.

I colored with Copics:

Skin: E00, 11, 21, R20
Hair: E13, E15, E18
Reds: R35, 37, 59
Blues: B93, B95, B97, BG10

Spectrum Noir Triblends:
Pencil- Citrus Blend, Burnt Orange Triblend,
Pale Pink Blend and Cool Grey

I used pattern paper from my stash, from one of my favorite paper manufacturers- Doodlebug.


I added 2 paper folds to the layers which I love how it shows off the patterns.


I added the setiment on a ribbon strip die, and some enamel dots add the finishing touches.

I hope you enjoyed my card.


See you soon!   


Monday, December 20, 2021

Candy Cane Princess from Paper Nest Dolls

 Hey everyone!     Today I am back with a fun card featuring Candy Cane Princess from Paper Nest Dolls.   


I printed the image on Copic Xpress-It cardstock and colored with Copics:

Skin: E00, 11, 21, R20
Hair: E11, 13, 15, 18, R35
Reds: R35, 37, 59, RV29
Whites: C0, 1
White Gel Pen


Although I often times cut with my Scan N Cut, for this one I fussy cut.


I used the Stitched Indented Squares Dies for the right side of the card.   I cut 2 layers, one with black cardstock and the other with pattern paper from my stash.    For the other part of my card, I cut 2 long rectangle layers.

I cut some pattern paper strips to go behind my image, again patterns and cardstock from my stash.

I used the Life is Better on the Farm Barn Die from Elizabeth Crafts Designs, - only using a few elements to create a simple white washed barn.

I used a North Pole Die- just the top to go at the top of the barn.

I inked the barn with Tim Holtz Distress Oxide- Weathered Wood.


I added foam tape behind the barn die and adhered to the card.

Next I added foam tape behind my image and adhered her to the card.

I used a couple of snowflake die cuts (from my die cut bin -already cut) and added to the card.    I added a few red gems to the snowflakes.


Next I added a lantern die cut behind and to the side of my Princess.

I used a sentiment strip from Simon Says Stamp - I attempted to link the specific one used however it looks like it's no longer available however, I have linked a similar one.

I used the CC Designs Banners Die to cut the sentiment out and inked with Cherry Cobbler Ink from Stampin Up.


I cut a few candy canes with my Silhouette and added to the top of the card.

I also cut a North Pole Sign pole with my Silhouette, and added to the card.


Lastly, added some branches, pine branches and pine cones to the top right of the card.


I hope that you enjoyed my card.


See you soon!


Wednesday, November 10, 2021

Holiday Smiles with La-La Land Crafts

Happy Wednesday!     Today I am back with one of my favorite clear stamp sets from the November 2021 New Release Holiday Smiles.


I stamped my hedgehogs on Copic Xpress It cardstock and cut with my Scan N Cut.

I colored with Copics
Hedgehogs: E11, E13, E15, E18, E31, E33, E35, E37, R20
Reds: R29, R37, R47, R59
Teals: BG11, BG13, BG15, BG18
Greens: YG17, G14
White Gel Pen


I used the Pierced Scalloped Rectangles Die - cut 2x to create a slimline card by layering the 2 pieces.

Next I used the Double Stitched Rectangles Dies- cut 2x to layer for my slimline.


Next I cut 2 of the new dome dies- I used the new Merry and Bright Paper Pack for my patterns.

I used the Winter Whimsy Background stamp to stamp on my Double Stitched Dome Die.


Next I used the North Pole Die and added to the left of the card.    I used the Layered Christmas Tree Die to add to the right of the card.    

I added some random enamel dots to the tree as he is adding ornaments to his tree.


Lastly I used the Stitched Merry Die and the Christmas from the Merry Christmas Die to add my greeting.


I added my hedgehogs with foam tape across the card to add the finishing touches.


I love how this turned out and hope you did too!


See you soon!


Tuesday, November 9, 2021

Bear Hugs from La-La Land Crafts

 Happy Tuesday!     Today I an back with a fun tag created with the Snow Globe Die part of the November 2021 New Release from La-La Land Crafts.     I used the Bear Hugs Stamp set from this release along with other items from the release.


I stamped my bear on Copic Xpress It cardstock and cut with my Scan N Cut.

I colored with Copics

Bear: N1, N3, N5, N7, R20 
Sweater: BG10, BG13, BG15, BG49 
White Gel Pen  


I cut 2 of the Snow Globe Dies- one with pattern paper from the Starry Night Paper Pack and one with Metallic Cardstock from Crafters Companion.

I used the new Mountains Stencil to ink mountains and birds onto the pattern paper.

I cut 2 Snow Banks Dies - on white cardstock- (and with the Snow Globes) to create the base of my scene.


Next I used the Mountains Stencil to add trees to the scene.


I cut several of the Winter Houses Dies- adding to my scene.  


I added a few snowflakes from the Three Snowflakes Dies to the scene and added a few crystal gems.


I added the sentiment to the base of the Snow Globe Die, and a gem on the left side.


Lastly I added the bear with foam tape on the side of the globe, and then added bakers twine to the top for the tag.


I love how this turned out and hope you did too!


See you soon!